Website Contribution Manual
Welcome to the Website Contribution Manual! Your input is highly valued, and your efforts can enhance the overall quality of our documentation. Please follow the guidelines below for a smooth contribution process.
Set Up Project Environment
Setting up the project environment means configuring a working setup on your computer so you can edit the Nuitka website. To do so, use one of the following ways:
Recommended Way
Learn how to efficiently contribute to the Nuitka website using Visual Studio Code and Dev containers. You will be amazed at how easy it actually is to contribute changes in this way. There is a manual way for advanced users described below in the Manual way section.
Before You Start
Download and install Docker using the Docker website.
Download and install Git on your computer. For doing that, select one of the following ways:
For Mac: download Xcode using App Store.
For Windows: go to the Git for Windows page, and then in the page, select Click here to download. Then, install Git by accepting the default settings.
For Linux: go to the Git for Linux page, and then select the needed option based on your Linux distribution.
Sign up on GitHub. An account on GitHub is free and allows you to submit your changes to the repository. For more, see the Sign-up instructions.
Download and install Visual Studio Code. Go to the Visual Studio Code website, and then select the Download button, which is universal for all the operating systems.
Getting Started
Open Visual Studio Code, and then, open terminal by selecting Ctrl + ` or Cmd + ` on Mac.
On the terminal, enter the following commands:
git config --global user.name "Your Name"
git config --global user.email "your.email@example.com"
Note
Replace Your Name with your actual name and your.email@example.com with your email address.
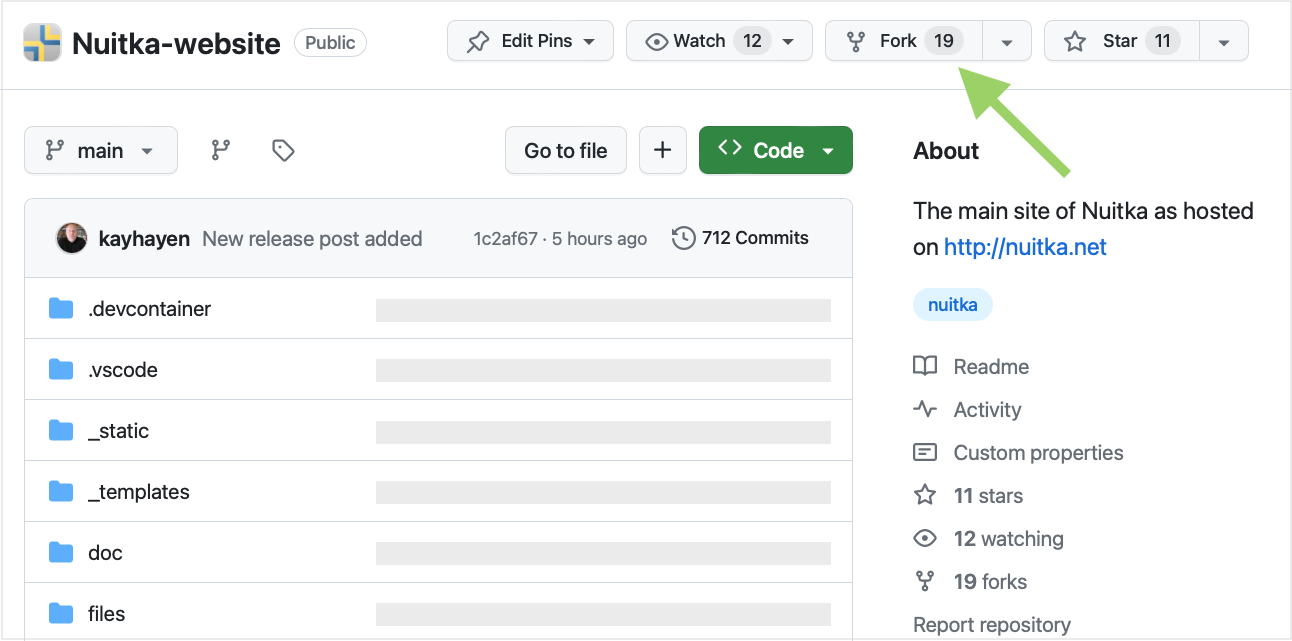
Go to Nuitka GitHub, and then, in the upper-right corner, select Fork.
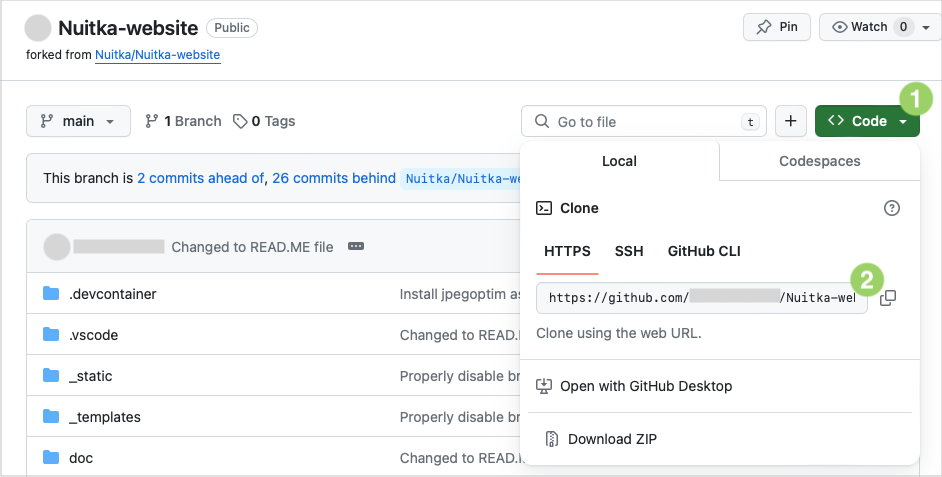
When you created the fork, go to your GitHub account and select your forked repository that called Your-name/Nuitka-website.
- Select Code (1), and then copy the web URL (2).
Open Visual Studio Code, and then, on the Welcome page, select Clone Git Repository.
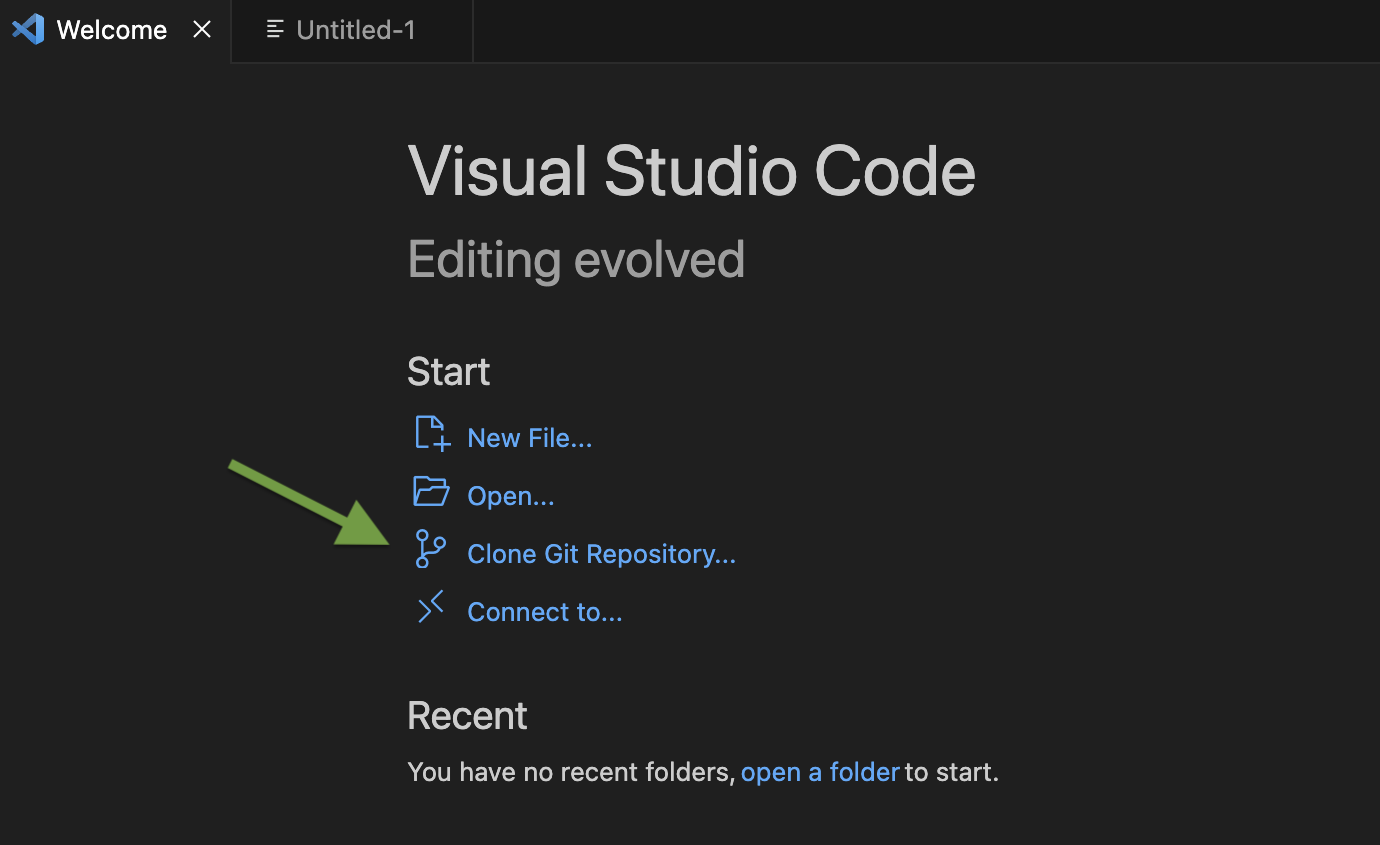
Note
Cloning is a term used in version control, meaning you create a local copy of a central repository and git is a tool used for it. Do not worry much about those things, Visual Studio Code hides it away from you largely.
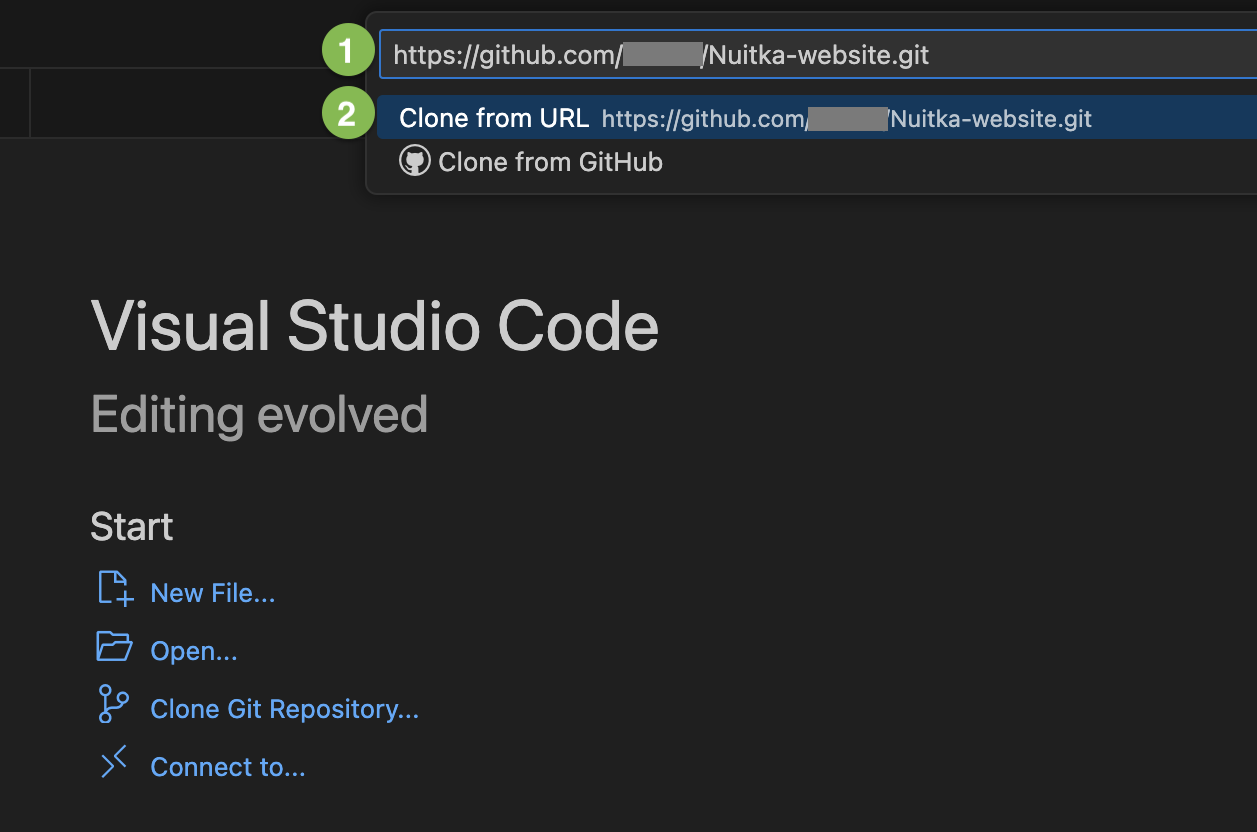
In the Provide repository url box (1), paste the link you pasted in the step 6, and then select Clone from URL (2).
Confirm a target folder, and create a folder inside of it, named Nuitka-website.git.
In the Would you like to open the cloned repository window, select Open.
It the Do you trust the authors window, select Yes, I trust the authors.
Once you do that, you will see the Folder contains a Dev Container configuration file window. Select Reopen in Container.
The Dev Container will start and download a small container image of Ubuntu, which is a popular Linux from Microsoft server. Then, it will run a few commands to customize the image, and build and render the pages of the web site.
Note
Do not worry, that this is Linux, you won’t have to notice or do anything different at all. The container image is automated and Visual Studio Code will deal with git for you.
After some time, it will prompt you to open a localhost in your standard browser, and you can use it to navigate the website. Everything but the shop parts will work, since these are not included in the repo, and secret (using private keys).
Make and Save Your Changes
Make your change
Pick the page you want to edit, for example,
doc/index.rst, select Ctrl + S (or Cmd + S for Mac) to save changes and rebuild the website. When the rebuild is over, you can preview your changes in your local copy of the website in your browser. You can find the link for the local copy of the Nuitka website in the Terminal tab.Some kinds of changes, such as changes to the CSS theme, or JavaScript may require a relaunch. Then use the Dev Container: Rebuild container command. It will take a short moment to fully refresh the project and implement your changes. For usual edits of .rst pages, you don’t need to relaunch or rebuild the container.
Stage and Commit Your Change
When you’re ready to suggest your changes to the original Nuitka website, you need to stage your changes. In the Visual Studio Code, find the Source Control tab, where you will see the list of changes you made. Select + next to each change you want to stage. Then, in the Message box, enter the description to the changes you staged. Then, select the Commit button. For more details, refer to the Commit guidelines.
Push Your Changes
In the Source Control tab, select
 , and then select
Push.
, and then select
Push.Create a Pull Request
By selecting the command GitHub Pull Requests: Create Pull Request, Visual Studio Code will guide you through the process of making a PR out of your pull request.
Communicate About Your Pull Request
Once your pull request is submitted, you’ll receive a URL for tracking its progress. If any changes are requested during the review process, you’ll be notified and can simply make the necessary updates directly within the project. After making the changes, you’ll either update the pull request or be informed when it’s merged.
Manual Way
This is used to build the Nuitka website. Enhancements of all kinds are
welcome. You will need Python 3.10 and pipenv to build it.
# Creates a virtualenv with all that is needed to develop the
# site.
python3 -m pip install -U invoke
python3 -m invoke virtualenv

# Now lets build the site, to see if it's all correct.
python3 -m invoke doc

# Optionally build the localized sites.
python3 -m invoke intl -l zh_CN
python3 -m invoke intl -l de_DE
...

# post-processing, e.g. adds language switcher, compact
# JS/CSS, adapts external links, and more.
python3 -m invoke run -t post-process

# Start local web server with the site, and do automatic
# rebuilds. Localization are rebuilt if they were previously
# built.
python3 -m invoke run -t serve-site

# Browse it (Linux)
xdg-open http://localhost:8080
# Browse it (Windows)
explorer http://localhost:8080
How We Work
In this section, we provide insights into our workflow and the tools we use to streamline our collaboration on the Nuitka website.
Sphinx
The Nuitka website is powered by Sphinx — a documentation generation tool widely used in the software development community. We use Sphinx to render user-friendly web pages for Nuitka, as the one you are looking at. To get more details about Sphinx, see Sphinx documentation.
reStructured Text (reST)
Sphinx uses reStructured text (reST) as its markup language, which is similar to Markdown but more powerful. You will need reST to edit pages of the website. Check out the syntax in the Sphinx documentation.
Sphinx Theme
We are using the customization of the Read the Docs Sphinx Theme. The
current configuration is in shared_conf.py file is pretty basic. We
might want to explore and document our choices for some of these
options.
Sphinx Extension: Grids
We use Grids, a component of the Sphinx Design extension, to build the layout of our website pages.
Sphinx Extension: ABlog
We are using a Sphinx extension called ABlog to create the RSS feeds and pages of the Nuitka blog. To read about ABlog configuration options, see the ABlog documentation.
Document Formatting
In order to format the current document, in Visual Code, select the task
autoformat current file which will make automatic changes to the
file for consistent header formatting, etc.
All PRs should have their changed files formatted that way. We do not yet have a commit hook that does it.
Image Optimization
We optimize all the images we insert in the website to enhance website
performance and achieve better search engine rankings. To optimize
images, run the task autoformat PNG images or autoformat JPEG
images or autoformat current file in Visual Code, the latter with
the image being open.
Otherwise if you are not in the Dev Container, open a new terminal in the and paste the following code snippet.
# Optimize PNG files like this, normally not needed, this
# is lossless.
sudo apt-get install optipng
find . -iname *.png -a -type f -exec optipng -o7 -zm1-9 {} \;

# Optimize JPEG files like this, normally not needed, this
# is lossless.
sudo apt-get install jpegoptim
find . -iname *.jpg -a -type f -exec jpegoptim {} \;
Color Palette
If you create any visuals for Nuitka, such as presentation slides, diagrams, or even screenshots, keep in mind the following brand colors:
- primary colors:
Blue #599DD2
Yellow #FFD43B
Grey #CCCCCC
- secondary colors:
Dark Blue #2A3990
Green #00916E
Writing Style Guide
When writing any text on the Nuitka website, especially step-by-step guidelines, strive to follow the Microsoft Style Guide.
Opportunities for Contribution
In this section, you can see the ways to contribute to the Nuitka website.
Create a New Posting
To create a new page on the Nuitka website, do the following:
Open Visual Studio Code, and then go to the Explorer tab to navigate to the directory of the project.
Right-click on the directory where you want to create the new posting, then select New File. Or select Ctrl + Shift + P or (or Cmd + Shift + p for Mac).
Name the file with the .rst extension. For example, my-new-posting.rst, obviously with a better name.
Save the file by selecting Ctrl + S (or Cmd + S for Mac).
Translate Pages
You can help translate pages into your language.